Introduction
Brute force attacks are one of the most common threats to servers exposed to the internet. Attackers repeatedly try different username and password combinations until they gain access. Services like SSH, FTP, and web login panels are frequent targets. Fail2Ban is a powerful and lightweight security tool that helps protect your server by automatically blocking suspicious IP addresses after repeated failed login attempts.
This guide explains what Fail2Ban is, how it works, and how to configure it effectively for server protection.
What is Fail2Ban
Fail2Ban is a security tool for Linux servers that monitors log files and detects repeated failed login attempts. When it identifies suspicious behavior, it automatically bans the offending IP address for a defined period of time.
It works with many services including SSH, Apache, Nginx, FTP, and mail servers. Instead of manually blocking attackers, Fail2Ban automates the process, reducing admin workload and improving security.
How Fail2Ban Works
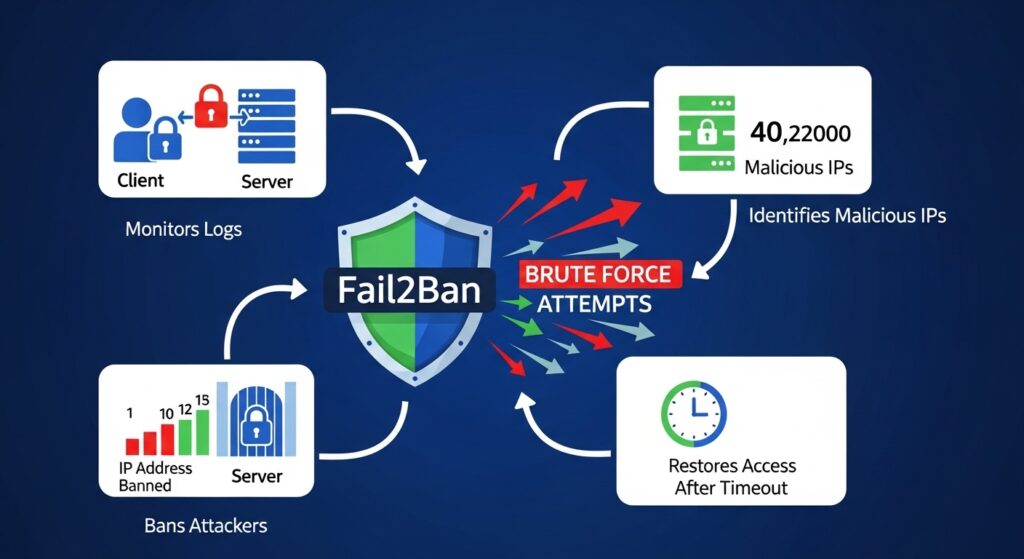
Fail2Ban operates using three main components.
First, it monitors log files generated by system services. These logs contain information about login attempts and errors.
Second, it uses filters to identify patterns such as repeated failed login attempts.
Third, it applies actions such as blocking the IP address using firewall rules like UFW or iptables.
Once the attack stops, the IP can be unbanned automatically after a configured time.
Step 1 Install Fail2Ban
Fail2Ban can be installed easily using the system package manager. On most Ubuntu or Debian systems, installation takes only a few commands. After installation, the service starts automatically in the background.
Step 2 Enable and Start the Service
After installation, enable Fail2Ban so it runs on system startup. Then start the service and verify that it is active. This ensures your server is protected immediately after reboot.
Step 3 Configure Basic Settings
Fail2Ban uses a configuration file where you define rules and behavior. It is recommended not to edit the default file directly. Instead, create a local configuration file to override settings.
In this file, you can define parameters such as ban time, find time, and maximum retry attempts.
Step 4 Protect SSH from Brute Force Attacks
One of the most important uses of Fail2Ban is protecting SSH access. Configure a jail for SSH that monitors login attempts. If too many failed attempts occur within a short time, Fail2Ban will automatically block the IP address.
This significantly reduces the risk of unauthorized access attempts on your server.
Step 5 Integrate Fail2Ban with Firewall
Fail2Ban works best when integrated with a firewall like UFW. When an IP is banned, Fail2Ban adds a rule to block that IP at the firewall level. This ensures malicious traffic never reaches your services again.
Step 6 Customize Ban Settings
You can adjust how strict Fail2Ban behaves. The ban time determines how long an IP stays blocked. The find time defines the window for detecting failed attempts. The max retry setting controls how many failed attempts are allowed before a ban is triggered.
Fine tuning these values helps balance security and usability.
Step 7 Monitor Fail2Ban Logs
Fail2Ban keeps detailed logs of all actions it takes. Monitoring these logs helps you understand attack patterns and verify that the system is working correctly. It also helps identify false positives if legitimate users are being blocked.
Step 8 Unban IP Addresses When Needed
Sometimes legitimate users may get blocked accidentally. Fail2Ban provides simple commands to remove bans manually. This ensures that you can restore access quickly when needed.
Step 9 Best Practices for Fail2Ban
Always combine Fail2Ban with strong authentication methods like SSH keys. Keep your system updated to ensure compatibility with new log formats. Avoid overly aggressive ban settings that could block legitimate users. Regularly review logs to understand attack trends.
SEO Keywords and Optimization
Primary keywords include Fail2Ban setup, brute force protection Linux, server security tool, and SSH protection Fail2Ban. Secondary keywords include automatic IP banning, Linux security hardening, intrusion prevention system, and SSH brute force prevention.
Use structured headings, clear explanations, and practical steps to improve readability and SEO performance. Naturally include keywords throughout the content without overstuffing.
Conclusion
Fail2Ban is a simple yet powerful tool for protecting servers from brute force attacks. By automatically detecting and blocking malicious IP addresses, it reduces security risks and improves overall server safety. When combined with firewalls and secure authentication methods, it becomes an essential part of any server security strategy.